By Bernhard Malle
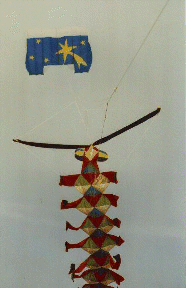
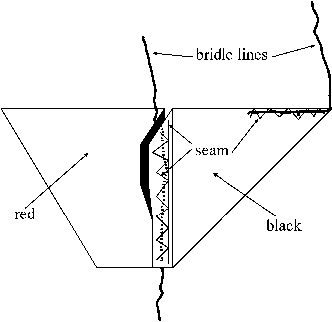
Fig. 1: Overview of the Centipede
Building a centipede has long been on my wish list of new projects. One of the favourite kites for this purpose was a soft-centipede, like the one that is built and sold by Peter Lynn.
The reason that I did not dare to build one had always been the complexity of this kite. After the Fan\"o meeting of 1994 I decided to take a closer look at this kite and I found out, that the kite is built out of lots of triangles with only two different sizes. I again was impressed by the genius of Peter Lynn, who has invented a kite, that looks very nice and complex, but is very easy to build and where you even can use scrap pieces of ripstop.
The following is a plan of my version of a soft centipede. I can not call it an original design, because it is built after the centipedes of Peter Lynn. This plan is published with permission of Peter Lynn (Thank you, Peter). It may be freely copied and distributed by anyone. It may not be reprinted in any magazine without my permission.
This plan may not be used to produce the centipede commercially!
The centipede is a line toy, i.e. it will not fly on its own. The centipede is connected to the flying line of a lifting device. For the lifting device, a parafoil, flowform, rokkaku or 3D-box can be used. When choosing a lifting device make sure that it generates enough lift - even the small centipede generates a lot of drag!
Quoting from a letter from Kirri Lynn: ``Peter Lynn made this type of kite about ten years ago. It was the first large inflatable he made. (He was having problems with excess weight on planes so he decided to build something that wouldn't have so many sticks.)''
It may also be of interest that Peter developed at least two different types of the centipede. Besides the version that I am going to describe right now, there is also a version of the centipede without the tentacles, but with only a spar that spread the first pair of legs.
Before starting to cut buy or cut or sew anything, please read the plan. Some details in the plan might not be obvious from the beginning. It is difficult to explain all details without the help of pictures.
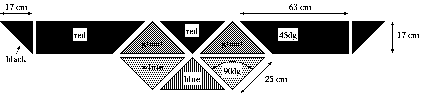
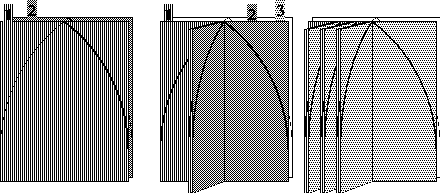
Fig. 2: One Segment of the Body
For the small (approx. 3m long) version of the centipede you need ripstop in six different colors. According to my version these are: red and blue for the main body and white and green for those parts of the body, where the legs are attached. The legs are made of red and black ripstop and for the eyes you need small pieces of blue and yellow ripstop. You can choose nearly any other combination of colors, but for understanding the plan and the way, the different parts are sewn together, I use these colors as reference. As mentioned above the body consists of isosceles triangles (triangles with two equal length sides). Figure 2 shows one segment of the body. The amount of ripstop is measured for a centipede with ten legs on each side. The size of the triangles was chosen so that you can use normal wide ripstop (104cm or 41") and get 8 triangles out of a stripe of 25cm. You can of course also use scrap pieces.
Additionally you need mesh (25cm x 25cm) for the air inlet at the front of the head and two spars for the tentacles. As I had some old spars of carbon, I used those which is certainly an overkill. For the tips of the legs and the sleeves for the tentacles, you need some more black ripstop (refer to the dimensions given in the drawings). All in all you need:
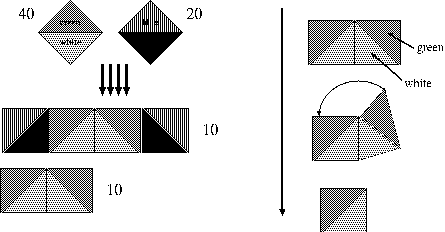
Fig. 3: Sewing the ``Building Blocks'' of the Body
This plan describes the small version of the centipede with ten legs on each side. It is identified by the flat legs of the centipede which are only made by one single piece of ripstop. If you plan to make larger versions of the centipede, you should make the legs out of two layers of a patchwork of small triangles to make it hollow similar to the body, so that they can also be filled with air.
The dimensions in fig. 2 are shown without any seam allowance. If you use them, then always add 6mm to each side. I did not use the seam allowance. Instead I marked a distance of 6mm at the side of the foot of the sewing machine and therefore made all seams exactly 6mm inside of each side.
I have hot-cut all the triangles. For some kites it is possible to simply cut the ripstop with scissors if you make always a double seam. For reasons of simplicity I have decided to only make simple seams and therefore it is better to hot cut the pieces. You need 22 red, 22 blue, 40 white and 40 green triangles for the body and the legs. For the throat you need another two red triangles. Each leg is made out of one piece of red and one piece of black ripstop (that makes 20 red and 20 black pieces).
After you have cut out all the triangles for the body, sew panels together along the diagonals: white with green and red with blue as shown in Fig. 3 (upper part). Please make sure, that all seams are on the same side. Then sew two green/white parts together as shown in fig. 3 (left side/lower part). Up to this point, all of your parts should be identical. With half of the green/white parts, you sew a short side of one red triangle of a red/blue square to the short side of the green triangle of the white/green square. Do the same on the other side of the white/green square so that you end up with a long rectangular piece of eight pieces of ripstop (again see fig. 3, left side/middle part). At the end, you should have 10 pieces of the green/white patchwork and ten pieces of the white/green/red/blue patchwork.
Please note: The more carefully you work, the easier is the whole sewing, especially when sewing the sixth triangle to one point. Good news for the lazy ones (like me): This kind of patchwork is very forgiving: Not sewing carefully only results in a little bit more difficult work. The result of both ways of working is more or less the same.
After having prepared all the different pieces of triangles and legs, it is now time to finish the body. The small green/white rectangles are used for the left side of the body and the long green/white/red/blue ones build up the right side. Now start finishing the left side of the centipedes body. Take the white/green parts, fold them along the seam between the two white parts and sew the green parts together (see fig. 3, right side). Make sure that the seams are all on one side. In between the green parts, add a leg (see fig. 4 / left side). The legs should be a little bit smaller than the corresponding opening in the body. This makes it easier to sew the legs in place. Be sure to sew the leg in the right way in between the green parts, because otherwise, the leg is not perpendicular to the body but parallel.
Fig. 4: Building the body from two parts
A small hint: the end of the tip of the leg must be at the top (in the direction of the head) and - in my color scheme - the white triangles are in the direction of the tail, and green ones in the direction of the head. So start by sewing the above mentioned tip to the place where the other six triangles meet (see fig. 4).
If you think, that I lay too much stress on this topic, you are invited to remove the seams from 20 parallel legs from the next centipede that I am going to make...
Now sew the right side of the segments. Take the long rectangles and again fold them along the white/white seam. Sew a leg in between the free short side of the green rectangles. Again be aware to sew in the legs perpendicular, not parallel to the body. Do not sew any seam on the blue rectangle. These are later on used to connect the different segments to the whole body.
If you have any difficulties in figuring out, which part has to be sewn to which other part, lay the whole ripstop on the ground and check it.
Please note that the black triangles at the outer tip of the legs are still missing. They are attached to the legs, when the whole body is already assembled. The reason for this is that one part of the bridle, that connects the different legs is sewn into the seam between the green and the black part and it is easier to do this, when all legs are already attached to the body.
Now you can go on by making the real tail: sew together the remaining two pieces of red/blue ripstop by sewing the short sides of the red parts of the front and the back together.
The next steps must be done for each of the ten next segments. Start by sewing the right white part of the next segment to the blue part of the just finished segment on front and back side. Go on by sewing one white part of the left part of the next segment to the remaining side of the blue segment on the corresponding side of the centipede (see fig. 4). Close the body by sewing the green parts to the red parts. And continue with the next segment.
For the throat, the connection between body and head, you need two other red triangles. Fold one red triangle in the middle and sew it with a short side to a blue triangle from the body. Sew the other short side of the red triangle to the blue triangle of the back side of the body. Do the same with the other red triangle (see fig. 5).
Now hot cut 20 pieces of black ripstop according to fig. 2. Sew these triangles to the outer tip of the red legs. Make a double seam and when making the second seam, use a zig-zag stitch to also attach the bridle line to the legs (see fig. 6). One bridle line is used to connect one leg the next one. The other one is used to connect one leg on the left with the corresponding leg on the right side and the bridle line to the centre of the body.
Now it should be clear, why the black parts of the legs are only now sewn to the red parts: Start at the first leg at the head of the centipede on the right side and work on with the second, third and always sew the bridle line from one leg to the next (lines G in fig. 14). Continue with the legs on the left side. The distance between each leg is 17cm. I have not marked the 17cm on the bridle line before, but I have marked this distance on the table, where my sewing machine stands on. When I had sewn the bridle line into the hem between red and black part, I marked a distance of 17cm on the bridle line. Then I laid the bridle into the hem of the next leg, so that the marker on the bridle line was just at the beginning of the hem. I fixed the bridle line to the leg with a zig-zag stitch. Once you have sewn all lines between the legs at their place, you can right now sew the bridle lines E to the tip of each leg. Make an overhand knot in the middle of line E and (later on) attach the line F to it. Then attach one end of the bridle line H to each of these points. Bridle line H is afterwards connect to the flying line (see below). For the dimensions of the lines, please refer to fig. \ref{table-1}.
Fig. 7-1: The Eyes of the Centipede (1) (GIF: 4k)
Fig. 7-2: The Eyes of the Centipede (2) (GIF: 4k)
Although the head of the centipede looks three-dimensional when it is flying, if you lay it to the ground it is flat.
The eyes of the centipede are done the same way as with the octopus: you need four blue pieces and four yellow pieces for each of the two eyes (see fig. 7). The following steps have to be repeated for all eight pieces and take the blue and yellow pieces alternating: Sew one piece to the next by making one seam from the top to the right side (see fig. 8). Then sew the next piece to the back of the previous. Go on until you have sewn all the eight pieces together. Now cut the remaining part of all squares away. Turn the whole eye to the right side.
One tentacle consists of one long sleeve of black ripstop with another small sleeve inside for the spar (see fig. \ref{centi-11}, detail F). The following instructions have to be repeated for both sleeves! Start by sewing two pieces of dacron to the sleeve (see detail A). Make two additional seams to the upper end of the sleeve (see detail A top/middle). Cut the sleeve (and the dacron) in the middle (see detail A). This cut will afterwards be inside of the big sleeve and is used to slip the spars into the small sleeve. Fold the whole ripstop so that the dacron is now on the inside.
Sew a velcro strip to the outside side of the top of the sleeve (detail B). Make a seam that forms the small sleeve for the spars (detail C). Sew a small loop of ripstop to the ends of the sleeve and one to the top. In fig. 8 these ripstop loops are shown on the outside of the sleeve to make the position clearer to the reader. Make sure that you sew them inside of the sleeve. They will later on come automatically to the outside when you turn the whole sleeve from the left to the right side. To this loop, the bridle line C which holds the legs in place is attached. Sew a small loop of ripstop to the side of the sleeve. Close the sleeve at the top (see fig. \ref{centi-11}). Now the sleeve should look like shown in detail D. Turn the sleeve to the right side.
Cut two spars so that they fit tightly into the inner sleeve. As I had some old carbon spars laying around I used them. I have also tested it with 10mm ramin spars.
Fig. 10: The Head
The head consists of the mesh for the air inlet, two eyes, the tentacles and some "patches" to keep everything together (see fig. 10).
Sew the mesh from the inside to the four triangular patches at the side of the air inlet. These triangles have the size of just the half of one of the triangles that were used for the body. Then sew the eyes to the sides of this mesh/ripstop combination according to fig. 10. Please note, that in the figure the eight segments of each eye are drawn with a straight line, although in reality they will be slightly curved. Close the head by sewing the ``back panel'' to the sides and to the top of the front side. The back panel consists of two normal size triangles and four half size triangles.
When closing the upper part of the head, do not forget to also sew the finished tentacles in-between the front and back panel just in the middle of the head.
Later you have to attach a bridle line to the top of the air inlet and to the bottom of it (lines D} in fig. 14). Reinforce those places the same way as the part of the body, where the central bridle line is attached (see fig. 12).
Now sew the finished head to the body. Start at the front and make sure, that the head is right in the middle. The front side is the side with the mesh... On the back side I have used a velcro strip to attach the head to the body, so that I can always ``open'' the body to make corrections.
If you do not use this velcro strip, you should add the bridle line enforcements and the sleeves for the tentacles before closing the body...
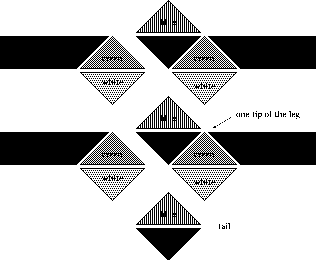
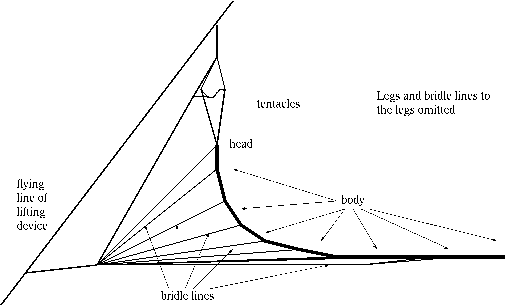
Fig. 11: The Bridle to the Body and the Legs
The bridle of the centipede is different than most other kites. There is not only one point, where the bridle is connected to the flying line, but the bridle consists of a 655cm long flying line with two attachment points, which is afterwards itself connected to the main flying line (of the lifting device as shown in fig. 15). Each segment of the body is connected via three bridle lines: one to the centre of the body segment and one to each leg-tip (see fig. 11). These three lines are connected to one single point. All the bridle lines from the segments/legs are then connected to one other bridle point.
Then there is the head. The tentacles are not there only for cosmetic reasons but are also used to spread the legs. The angle of attack of the whole centipede changes from the head to the tail: The head is relatively upset, whereas the tail of the centipede is flying almost parallel to the ground. This is done for several reasons. The head must be upset, because it would not be filled with air otherwise. The tail is nearly parallel to the ground because it acts as a stabilizer for the whole kite.
Fig. 12: Attaching the Bridle Line to the Body
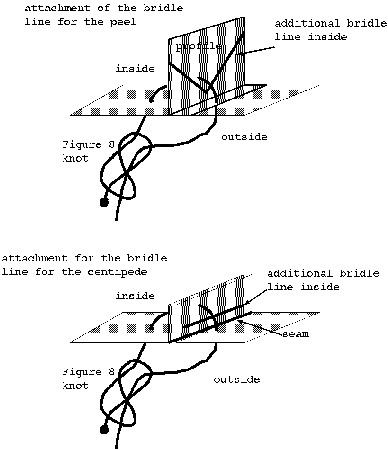
For the connection of the bridle lines to the body, I have modified a little bit the method that Andrew has recently described for the peel. In fig. 12 both methods are shown: The way the bridle line is attached to the peel in the upper part, and the way I am going to describe right now in the lower part.
As I do not have any profiles in the centipede, the seam allowance must play the part of it. I have sewn a piece of bridle line onto the seam allowance inside of the kite. Quoted directly from Andrews posting:`` To attach a bridle line to the reinforcement, use a needle with a handle. Thread some spectra (or something strong and thin) through the needle and tie both ends to the handle. Stick the needle through the body skin, the seam allowance (just above the line) and back through the skin, keeping the holes as close together as possible. Thread the bridle line through the loop of line in the needle and pull it through.''
Then make a figure-8 knot to attach the end of the bridle line to itself. The length of the bridle lines H to the different segments is shown in fig. 13.
1: 35cm 2: 60cm 3: 65cm 4: 96cm 5: 131cm
6: 141cm 7: 165cm 8: 173cm 9: 210cm 10: 235cm
The place where you have to attach the bridle line F in the method described above is the middle of one segment, where one red, one blue, two white and two green parts meet on the front side of the body of the centipede.
It does not matter, whether you attach the bridle line in the inside to the seam allowance of the seam between the red and green or the blue and white triangle as long as you take care of it when you stick the needle in the body: Be sure to move the bridle line around the additional bridle line and the seam allowance.
Fig13: Bridle to the Head and the Body(GIF: 20k)
Use a 268cm long bridle line (lines E) to connect the tips of the legs of one segment of the right and the left side according to fig. 14. Make an overhand knot in the middle of this line (line E). Attach the bridle line from the centre of each segment to this loop.
Connect the top of the two tentacles with a 210cm long bridle line (line B). Make an overhand knot in the middle of this line. Connect the top of each tentacle also to the first leg on the corresponding side with a 87cm long bridle line (lines C). The bridle line can be sewn in-between the seam allowance of the seam between the red and the black part of the leg (see fig. 6).
Take a 633cm long bridle line which will act as flying line of the centipede. The ends of this flying line will later on be attached to the flying line of a lifting device. Make four overhand loops into this line at 130cm, 351cm, 448cm and 555cm (all distances measured relative to the lower end of the line). Attach the line (A) from the tentacles to point 3 of the flying line. In order to be able to quickly adjust the bridle of the centipede to different angles of the flying line of the lifting device, all the lines to the ten segments (lines H) are attached to the end of line L which is attached to the point 1 of this flying line. For the length of each bridle line H, see fig. 13 and 16. The bridle of the centipede can therefore easily be trimmed by changing the length of line L. Connect the four bridle lines from the head (D) to point 2. Connect the additional line from the head of the top K and to the tentacles I to point 4.
Fig. 13: Overview of the Whole Bridle for the Centipede
B: 210cm C: 87cm D1: 148cm D2: 156cm D3: 152cm D4: 152cm
E: 134cm F: 190cm G: 17cm I: 128cm K: 87cm L: 180cm
Once you have finished the kite and attached all the bridle lines, you will notice that there are MANY of them. When packing the centipede please carefully store the bridle lines, otherwise you will have to extend your next kite event for an hour or so in order to detangle the bridle lines.
For the start of the centipede it is advisable to have another person to help you. First of all the lifting kite is started and attached to the ground. Then the upper end of the flying line of the centipede is attached to the line of the lifting kite. Afterwards the lower end is also attached to the flying line. Then you can SLOWLY let the lifting kite go higher and lift the centipede. When lifting off the ground the helping person has to make sure that each of the tentacles is on the right side of the flying line. Once the centipede is up in the air, the body filled and the whole construction generates some drag, the tentacles will not any longer try to move to the wrong side of the flying line.
No plan without ``Improvements'' section...
Next time I will build the centipede with bigger triangles and also with inflatable legs. A three meter long kite looks so small when it is lifted in the air... :-)
Another change, not really an improvement, could be the use of a different color schema, than the one that I have just described. For one version of the centipede, I have used rectangular pieces (two triangles together) and colored the centipede from the middle to the tip of the legs in black, blue and red. Additionally I have made a small symbol on the black rectangles (if I find the time, I will scan a picture of this centipede and send to the ftp-server in Hawaii).
If you find this plan useful, please report it to me. But also do not forget, to send me a message, if there is something unclear (or even wrong) in the description. My email address (preferred way of contact) is
Bernhard.Malle@dbag.ulm.daimlerbenz.com
If you want to start right now and make a centipede, consider that you have to hot cut about 180 pieces of ripstop and sew them together! :-) Perhaps you end up with the idea of buying one of the real centipedes from Peter Lynn instead...